- Welche Platten haben wir denn:
# vxdisk -o alldgs list
DEVICE       TYPE      DISK         GROUP        STATUS
c0t0d0s2     sliced    rootdisk_1   rootdg       online
c1t0d0s2     sliced    -            -            error
c1t5d0s2     sliced    -            -            error
c1t10d0s2    sliced    -            -            error
c1t16d0s2    sliced    -            -            error
c1t19d0s2    sliced    -            -            error
c1t22d0s2    sliced    -            -            error
c1t26d0s2    sliced    -            -            error
c2t32d0s2    sliced    -            -            error
c2t37d0s2    sliced    -            -            error
c2t42d0s2    sliced    -            -            error
c2t48d0s2    sliced    -            -            error
c2t51d0s2    sliced    -            -            error
c2t54d0s2    sliced    -            -            error
c2t58d0s2    sliced    -            -            error
- error bedeutet nicht Fehler, sondern das die Platten nicht unter Veritas Kontrolle stehen.
Mit dem Befehl vxdisksetup -i c1t0d0 für alle Platten können wir das ändern.
- Nun sollten alle Platten drin sein:
# vxdisk -o alldgs list
DEVICE       TYPE      DISK         GROUP        STATUS
c0t0d0s2     sliced    rootdisk_1   rootdg       online
c1t0d0s2     sliced    -            -            online
c1t5d0s2     sliced    -            -            online
c1t10d0s2    sliced    -            -            online
c1t16d0s2    sliced    -            -            online
c1t19d0s2    sliced    -            -            online
c1t22d0s2    sliced    -            -            online
c1t26d0s2    sliced    -            -            online
c2t32d0s2    sliced    -            -            online
c2t37d0s2    sliced    -            -            online
c2t42d0s2    sliced    -            -            online
c2t48d0s2    sliced    -            -            online
c2t51d0s2    sliced    -            -            online
c2t54d0s2    sliced    -            -            online
c2t58d0s2    sliced    -            -            online
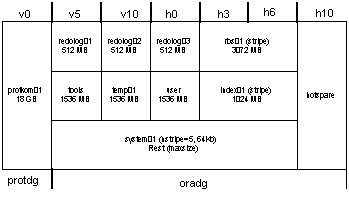
- Wir benötigen 2 Diskgruppen. Eine für die eigentliche Oracle Installation (oradg) eine zweite
für einen Dienst den wir zusätzlich schreiben.(protdg)
Hier macht es sich besonders nett wenn man die Plattenaufteilung vorher ausdenkt.
Wenn man eine Oracle-Admin hat sollten man den vorher fragen, erfahrungsgemäß haben die eigene Vorstellungen vom
Plattenlayout. Auch sollte man sich ein Namensschema ausdenken. Die Platte lv0 steht für:
l Array mit Namen links
v Platteneinschub vorn
0 Steckplatz 0
# vxdg init protdg lv0=c1t0d0s2
# vxdg -g protdg adddisk rv0=c2t32d0s2
#
# vxdg init oradg lv5=c1t5d0s2
# vxdg -g oradg adddisk lv10=c1t10d0s2
# vxdg -g oradg adddisk lh0=c1t16d0s2
# vxdg -g oradg adddisk lh3=c1t19d0s2
# vxdg -g oradg adddisk lh6=c1t22d0s2
# vxdg -g oradg adddisk lh10=c1t26d0s2
# vxdg -g oradg adddisk rv5=c2t37d0s2
# vxdg -g oradg adddisk rv10=c2t42d0s2
# vxdg -g oradg adddisk rh0=c2t48d0s2
# vxdg -g oradg adddisk rh3=c2t51d0s2
# vxdg -g oradg adddisk rh6=c2t54d0s2
# vxdg -g oradg adddisk rh10=c2t58d0s2
- Und auch nach diesem Schritt nachsehen ob alles so aussieht wie wir denken:
# vxdisk -o alldgs list
DEVICE       TYPE      DISK         GROUP        STATUS
c0t0d0s2     sliced    rootdisk_1   rootdg       online
c1t0d0s2     sliced    lv0          protdg       online
c1t5d0s2     sliced    lv5          oradg        online
c1t10d0s2    sliced    lv10         oradg        online
c1t16d0s2    sliced    lh0          oradg        online
c1t19d0s2    sliced    lh3          oradg        online
c1t22d0s2    sliced    lh6          oradg        online
c1t26d0s2    sliced    lh10         oradg        online
c2t32d0s2    sliced    rv0          protdg       online
c2t37d0s2    sliced    rv5          oradg        online
c2t42d0s2    sliced    rv10         oradg        online
c2t48d0s2    sliced    rh0          oradg        online
c2t51d0s2    sliced    rh3          oradg        online
c2t54d0s2    sliced    rh6          oradg        online
c2t58d0s2    sliced    rh10         oradg        online
- Nun bauen wir die Volumen für Oracle
# vxassist -g oradg make redolog01 512m layout=mirror-concat lv5 rv5 &
# vxassist -g oradg make redolog02 512m layout=mirror-concat lv10 rv10 &
# vxassist -g oradg make redolog03 512m layout=mirror-concat lh0 rh0 &
# vxassist -g oradg make rbs 3072m layout=mirror-stripe lh3 lh6 rh3 rh6 &
# vxassist -g oradg make tools 1536m layout=mirror-concat lv5 rv5 &
# vxassist -g oradg make temp01 1536m layout=mirror-concat lv10 rv10 &
# vxassist -g oradg make user 1536m layout=mirror-concat  lh0 rh0 &
# vxassist -g oradg make index01 1024m layout=mirror-stripe lh3 lh6 rh3 rh6 &
- Für das letzte Volumen wollen wir den restlichen Platz verbraten.
Aber wie viel Platz ist noch ?
# vxassist -g oradg maxsize layout=mirror-stripe lv5 lv10 lh0 lh3 lh6 rv5 rv10 rh0 rh3 rh6
Maximum volume size: 155777024 (76063Mb)
Mit dieser Info (76063Mb) bauen wir das letzte Volumen
vxassist -g oradg make system01 76063m layout=mirror-stripe nstripe=5 mirror=ctlr ctlr:c1 ctlr:c2 \
lv5 lv10 lh0 lh3 lh6 rv5 rv10 rh0 rh3 rh6
- Das selbe für die protdg
vxassist -g protdg make prot01 10240m layout=mirror-concat lv0 rv0 &
- Ausserdem legen wir zwei Spare Platten an
vxedit -g oradg set spare=on lh10
vxedit -g oradg set spare=on rh10

# vxdisk list |grep spare
c1t26d0s2    sliced    lh10         oradg        online spare
c2t58d0s2    sliced    rh10         oradg        online spare
- Mit dem nächsten Schritt sollten wir warten bis alle Volumen gebaut sind:
# vxtask list
TASKID  PTID TYPE/STATE    PCT   PROGRESS
   170         RDWRBACK/R 30.81% 0/155777024/48001392 VOLSTART system01
   172         RDWRBACK/R 58.61% 0/20971520/12291624 VOLSTART prot01
- Normalerweise würden wir jetzt ein Filesystem auf die Volumen legen. Das wird aber nicht funktionieren,
weil der Cluster den Zugriff auf alle device blockiert. Von den eben mühsam erstellen Volumen weiss
der Cluster aber nichts
# scstat -D
-- Device Group Servers --
                         Device Group        Primary             Secondary
                         ------------        -------             ---------

-- Device Group Status --
                              Device Group        Status
                              ------------        ------
- Wir erzählen also unserem Cluster was von seinen Disk Gruppen
# scconf -a -D type=vxvm,name=protdg,nodelist=db1:db2
# scconf -a -D type=vxvm,name=oradg,nodelist=db1:db2
Und hat er er die nun ?
# scstat -D
-- Device Group Servers --
                         Device Group        Primary             Secondary
                         ------------        -------             ---------
  Device group servers:  protdg              db1                 db2
  Device group servers:  oradg               db1                 db2


-- Device Group Status --
                              Device Group        Status
                              ------------        ------
  Device group status:        protdg              Online
  Device group status:        oradg               Online
- Dann können wir jetzt ja das Filsystem anlegen
newfs /dev/vx/rdsk/protdg/prot01
newfs /dev/vx/rdsk/oradg/rbs
newfs /dev/vx/rdsk/oradg/tools
newfs /dev/vx/rdsk/oradg/temp01
newfs /dev/vx/rdsk/oradg/user
newfs /dev/vx/rdsk/oradg/index01
newfs /dev/vx/rdsk/oradg/system01
newfs /dev/vx/rdsk/oradg/redolog01
newfs /dev/vx/rdsk/oradg/redolog02
newfs /dev/vx/rdsk/oradg/redolog03
- In die Datei /etc/hosts wird die logische IP des Oracle Servers eingetragen
# grep 3.5 /etc/hosts
192.168.3.5     db db.d-frust.de
- Die Gruppe dba und der User oracle wird angelegt:
groupadd -g 2005 dba
useradd -m -c "oracle user" -g dba -u 2005 -d /opt/oracle oracle
passwd oracle
- Alle Diskgruppen sollten Oracle gehören. Das muss man per vxedit einstellen,
und diese Änderungen auch per scconf dem Cluster mitteilen:
# vxprint -l -v redolog01 |more
Disk group: oradg
Volume:   redolog01
info:     len=1048576
type:     usetype=fsgen
state:    state=ACTIVE kernel=ENABLED cdsrecovery=0/0 (clean)
assoc:    plexes=redolog01-01,redolog01-02
policies: read=SELECT (round-robin) exceptions=GEN_DET_SPARSE
flags:    closed writeback
logging:  type=REGION loglen=0 serial=0/0 (disabled)
apprecov: seqno=0/0
recovery: mode=default
recov_id=0
device:   minor=24000 bdev=315/24000 cdev=315/24000 path=/dev/vx/dsk/oradg/redolog01
perms:    user=root group=root mode=0600

# vxedit -g oradg set user=oracle group=dba redolog01
# vxedit -g oradg set user=oracle group=dba redolog02
# vxedit -g oradg set user=oracle group=dba redolog03
---usw.-----

#  vxprint -l -v redolog01 |grep perms
perms:    user=oracle group=dba mode=0600

# scconf -c -D name=oradg,sync
- Dann auf beiden Seiten die Mount- Point anlegen
# mkdir -p /global/oracle/system
# mkdir -p /global/oracle/index
# mkdir -p /global/oracle/rbs
# mkdir -p /global/oracle/temp
# mkdir -p /global/oracle/tools
# mkdir -p /global/oracle/user
# mkdir -p /global/oracle/redolog01
# mkdir -p /global/oracle/redolog02
# mkdir -p /global/oracle/redolog03
- dann diese Punkte in die /etc/vfstab eintragen:
/dev/vx/dsk/oradg/system01  /dev/vx/rdsk/oradg/system01  /global/oracle/system    ufs 2 yes logging,global
/dev/vx/dsk/oradg/index01   /dev/vx/rdsk/oradg/index01   /global/oracle/index     ufs 2 yes logging,global
/dev/vx/dsk/oradg/rbs       /dev/vx/rdsk/oradg/rbs       /global/oracle/rbs       ufs 2 yes logging,global
/dev/vx/dsk/oradg/temp01    /dev/vx/rdsk/oradg/temp01    /global/oracle/temp      ufs 2 yes logging,global
/dev/vx/dsk/oradg/tools     /dev/vx/rdsk/oradg/tools     /global/oracle/tools     ufs 2 yes logging,global
/dev/vx/dsk/oradg/user      /dev/vx/rdsk/oradg/user      /global/oracle/user      ufs 2 yes logging,global
/dev/vx/dsk/oradg/redolog01 /dev/vx/rdsk/oradg/redolog01 /global/oracle/redolog01 ufs 2 yes logging,global
/dev/vx/dsk/oradg/redolog02 /dev/vx/rdsk/oradg/redolog02 /global/oracle/redolog02 ufs 2 yes logging,global
/dev/vx/dsk/oradg/redolog03 /dev/vx/rdsk/oradg/redolog03 /global/oracle/redolog03 ufs 2 yes logging,global
Die Filesysteme werden im Cluster durch die s.g. HAStoragePlus Resource verwaltet. Diese holt Ihre
Informationen aus der /etc/vfstab.
Steht dort ufs 2 yes logging,global dann handelt es sich um ein globales Filesystem, das von allen Nodes gemountet wird.
Steht dort ufs 2 no logging handelt es sich um ein lokales Filesystem was von HAStoragePlus immer (nur) an den aktiven Node
gehängt wird..
- folgende Änderung in die /etc/system eintragen:
* Start aenderung fuer oracle
set shmsys:shminfo_shmmax=4294967295
set shmsys:shminfo_shmmin=1
set shmsys:shminfo_shmmni=200
set shmsys:shminfo_shmseg=40
set semsys:seminfo_semmni=200
set semsys:seminfo_semmsl=1000
set semsys:seminfo_semmns=3000
set semsys:seminfo_semopm=200
set semsys:seminfo_semvmx=32767
* End aenderung fuer oracle
und rebooten init 6
- Auf einem Node sollten nun Platten gemountet werden.
- Als User oracle kann nun die Oracle Software installiert werden. Dabei ist zu beachten das, keine
Standardinstallation vorgenommen wird. Die Oracle Binaries kommen nach /opt/oracle
und die eigentliche Datenbank nach /global/oracle
- als nächsten benötigen wir ein paar Anpassungen für den Fehlermonitor
$ sqlplus /nolog
SQL> connect / as sysdba
SQL> create user sc_fm identified by sc_fm;
SQL> grant create session, create table to sc_fm;
SQL> grant select on v_$sysstat to sc_fm;
SQL> alter user sc_fm default tablespace users quota 1m on users;
SQL> quit
Das Passwort identified by sc_fm ist natürlich nur ein Beispiel, und sollte auf etwas
sicherem gestellt werden. Die Tabelle v_$sysstate wird erst nach einiger Zeit erstellt. Wenn diese
Tabelle noch nicht da sein sollte, muss man eben eine Kaffepause machen.
- Überprüfen ob der Account auch wirklich funktioniert:
$ sqlplus sc_fm/sc_fm
SQL> select * from sys.v_$sysstat;
SQL> quit
- Eine weitere Tabelle anlegen
$ sqlplus /nolog
SQL> connect / as sysdba
SQL> create table mytable (mykey VARCHAR2(10), myval NUMBER(10));
SQL> insert into mytable values (´off´, 0);
SQL> insert into mytable values (´on´, 1);
SQL> commit;
SQL> select * from mytable;

MYKEY           MYVAL
---------- ----------
off                 0
on                  1
SQL> quit
- die beiden Dateien:
$ORACLE_HOME/network/admin/listener.ora und
$ORACLE_HOME/network/admin/listener.ora
müssen so angepasst werden das sie auf den logischen Hostnamen des Dienstes hören.
- jetzt sollte die Datenbank runtergefahren werden.
- Es müssen die drei Verzeichnisse mit den Oracle Binaries auf alle anderen Nodes kopiert werden:
/opt/oracle, /var/opt/oracle und /usr/local/bin
- Registrieren des Platten-Service beim Clusterframework
scrgadm -a -t SUNW.HAStoragePlus
- Auf allen Nodes installieren des Oracle Service von der CD
cd /cdrom/scdataservices_3_1_vb/components/SunCluster_HA_Oracle_3.1/Sol_9/Packages
pkgadd -d . SUNWscor
- Registrieren der beiden Oracle Service beim Clusterframework. Alle Service die beim Cluster angemeldet sind liegen unter /usr/cluster/lib/rgm/rtreg.
Das sind nur links auf die eigentlichen Verzeichnisse.
scrgadm -a -t SUNW.oracle_server
scrgadm -a -t SUNW.oracle_listener
- Jetzt bauen wir eine leere Resourcegruppe. Das ist so eine Art Umzugskiste, in die wiederum
kleinere Kisten (=Resourcen) gepackt werden, die bei einem Umzug von Oracle auf den anderen Node mitgenommen werden müssen.
Dabei bedeutet:
-g Name der Resource Gruppe
-h alle Node die darauf Zugriff haben
scrgadm -a -g oracle-rg -h db1,db2
- Als erste kleine Kiste kommt in diese Umzugskiste die IP-Adresse des logischen Host.
Sie muss in der /etc/hosts auf allen Nodes aufgelöst werden können.
-L zeigt an das es sich um den logischen Host Eintrag handelt
-g Name der Resource Gruppe
-l logischer Hostname aus /etc/hosts
scrgadm -a -L -g oracle-rg -l db
- Nun bauen wir eine Resource die alle notwendigen Filesystem enthät.
Man sollte in ein Scipt schreiben, weil der Befehl etwas länger sein wird.
-j Name der Resource
-g Name der Resource Gruppe
-t Typ der Resource (HAStoragePlus)
-x FilesystemMountpoints Alle Filesystem die mitgeschwenkt werden sollen
-x AffinityOn=true Mountpoint und Filesystem sollen auf dem selben Node liegen. Wenn das auf
false steht kann es passieren das z.B. Node1 die Oracle Datenbank hat, Node2 aber die Diskgruppen.
Der Zugriff würde dann über den Clusterinterconnect laufen.
 scrgadm -a -j oracle-hasp-res -g oracle-rg -t HAStoragePlus \
-x FilesystemMountpoints=/global/oracle/system,\
/global/oracle/index,/global/oracle/rbs,\
/global/oracle/temp,/global/oracle/tools,\
/global/oracle/user,/global/oracle/redolog01,\
/global/oracle/redolog02,/global/oracle/redolog03 \
-x AffinityOn=true
- Das folgende Scipt baut die Oracle Datenbank Resource.
-j Name der Resource
-g Name der Resource Gruppe
-t Typ der Resource (oracle_server)
-y resource_dependencies Diese Resource ist abhängig von der Resource für das Filesystem.
-x Connect_string Username/Passwort Kombination mit der sich der Agent mit der Datenbank verbindet.
 scrgadm -a -j oracle-db-rs -g oracle-rg \
-t oracle_server \
-y resource_dependencies=oracle-hasp-res \
-x Oracle_sid=oid1 -x Oracle_home=/opt/oracle/product/8.1.7 \
-x Alert_log_file=/opt/oracle/product/8.1.7/admin/oid1/bdump/alert_oid1.log \
-x Parameter_file=/global/oracle/user/oid1/pfile/initoid1.ora
-x Connect_string=sc_fm/sc_fm
In allen Fällen steht der Schalter -a für hinzufügen.
Falls man sich mal vertippt haben sollte kann man das mit dem Schalter -c gerade ziehen
So ändert man z.B. mit folgendem Befehl den Link auf das Oracle Parameterfile.
scrgadm -c -j oracle-db-rs -x Parameter_file="/global/oracle/user/oid1/pfile/initoid1.ora"
- Als nächstes bauen wir die Resource für den Listner
-j Name der Resource
-g Name der Resource Gruppe
-t Typ der Resource (oracle_listener)
scrgadm -a -j oracle-list-rs -g oracle-rg -t oracle_listener -x Oracle_home=/opt/oracle/product/8.1.7 -x Listener_name=LISTENER
- Wenn alles ok ist, dann kann die komplette Resource Gruppe aktiviert werden
scswitch -Z -g oracle-rg
- Oracle sollte nun anstarten